


The deadline for employers to file their National Social Security Fund (NSSF) returns is the 9th day of each month, and for someone who doesn’t know the exact procedure, it can become quite challenging.
Nevertheless, every employer with one or more employees must promptly register with NSSF as a contributing employer and promptly deduct and remit contributions on time.
According to the National Social Security Fund (NSSF) Act, late payments of mandatory contributions shall attract a penalty at the rate of 5 percent of the total contributions for each month or part of the month remitted late


It is, therefore, in the best interest of your business to maintain proper and up-to-date records of employees’ earnings and particulars for easy filing of returns before the deadline.
Lucky for you, this post simplifies the procedure for filing your returns online. However, to follow this procedure, you must register with the NSSF e-service to be able to log in.
Note: These steps apply to both new NSSF and old NSSF rates. See NSSF new rates Calculator
Here’s the process:
1. Getting Started: Create a Payroll Excel Sheet
Create a payroll of your employees using Microsoft Excel and ensure that the file is correctly formatted according to the NSSF template.
Template Guidelines
- No formulas in the cells
- No Special Characters, e.g. /, “, – etc.
- Nothing should appear after the last record, e.g., Totals, Complied by
- Columns A to F should be in text format, the rest, general format (Gross Pay and Voluntary)
- No blank rows
- No hidden rows or columns
- File must have one sheet only
- Payroll Number is optional
- Include leading zeros and trailing ‘X’ where applicable for NSSF number
- NSSF number should be a minimum of 9 characters and a maximum of 10 characters
Worth noting is that the format doesn’t have NSSF contribution amounts. It works with the employees’ Gross Salaries. It also includes NSSF Membership Number, KRA PIN, and voluntary amounts.
2. Log in to the NSSF e-Service Portal
Navigate to the https://eservice.nssfkenya.co.ke/launch/. The link will pop up with the eService Main Menu.


Fig: Main Menu
Click on ‘Submission and Payments.’ A login screen will pop up
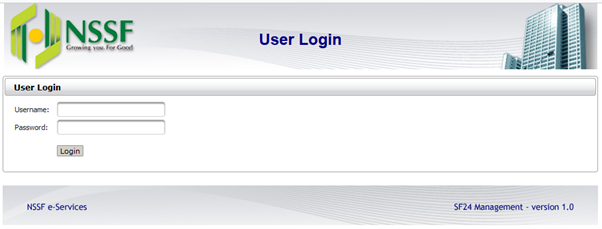

Fig: Login Screen
Log in with your details by entering your username and password.
After successful login, the system will prompt with the SF24 Management screen. The Home Page is located on the left
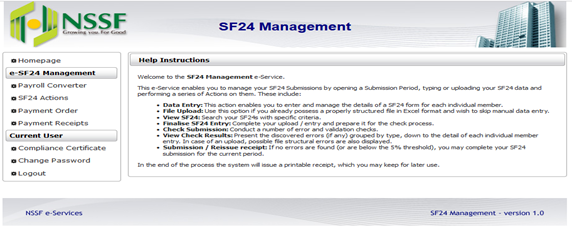

Begin by clicking on ‘Payroll Converter.’ The system will display Payroll Submission Screen:


3. Create a Payroll Period
Click on ‘Create Payroll Period’ to create a Payroll Period. Proceed:-
- Enter the Payroll period, i.e., 99/9999
- From the ‘Payroll Type,’ select ‘Regular Employees’
- On ‘Contribution Type,’ select the contribution type to be paid. Use the guidelines below
| Rates | Employer contribution | Employee contribution | Total |
| Tier 1 | 360 | 360 | 720 |
| Tier 1 & 2 | 1080 | 1080 | 2160 |
| Old rates | 200 | 200 | 400 |
NOTE: The NSSF rates are explained below. However, once the NSSF Act is unlocked, these will change.
- Click on ‘Open’ to continue


Fig: Payroll Period Creation
4. Upload Your SF24 File


Fig: File Upload
Click on ‘Ok’ to open the period. On the Action column, the system prompts ‘File Upload.’ Click on file Upload and ‘Choose’ to the location where you have saved the SF24.


Fig: SF24 Upload
Highlight the file and open it. Click on ‘Upload’ or ![]()


Fig : SF24 Upload/Attachment completion
After the message has been displayed, click on ‘Back’ to continue
5. Process Payroll Data
The system will respond with ‘Process Payroll Data’ on the Action column.


Click on the link to process the data. The system will process the data, and the message ‘Payroll Processing has been initiated. You will be notified about its progress using the link Payroll Processing Progress Update’.
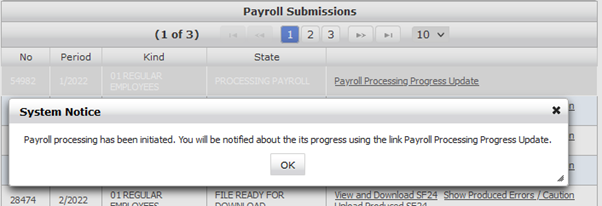

Fig: Payroll Processing Progress Update
Click on ‘Ok.’ Click on ‘Payroll Processing Progress Update’ for the system to prompt the next action.
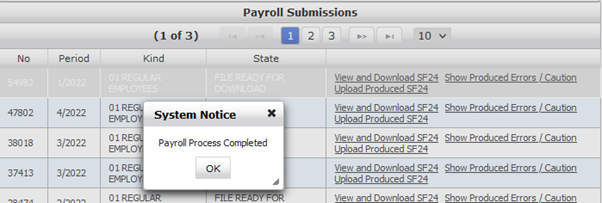

Fig: Payroll Processing Completion
The system will prompt ‘Payroll Process Completed,’ clicking on ‘Ok,’ the system will prompt three crucial links ‘View and Download SF24’, ‘Show Produced Errors / Caution’ and ‘Upload Produced SF24’.
6. View and Download SF24
Will display Member, Employer, and Total Contributions at the upper part of the Screen, and below will have details of all the employees who are being paid for. Kindly make sure that all the employees have their Surnames indicated where the Surname is missing; the record is in Error.


Fig: View and Download SF24
Show Produced Errors / Caution
Will display Errors found in the return and also give cautions on the Surname if it does not match the Surname as per the records held by the Fund
Upload Produced SF24
Click on this link to initiate a Submission.
7. SF24 Submission
The system will automatically create a submission period, and the Action Column will have ‘Check Submission.’


Fig: Check Submission
Click on ‘Check Submission’ to commence processing
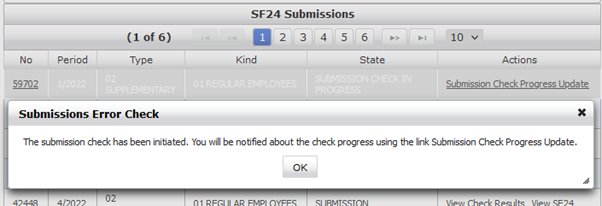

Fig: Submission Check Progress Update
The system will prompt with the above message. Click on ‘Ok’ and also click on ‘Submission Check Progress Update’ to refresh the process.
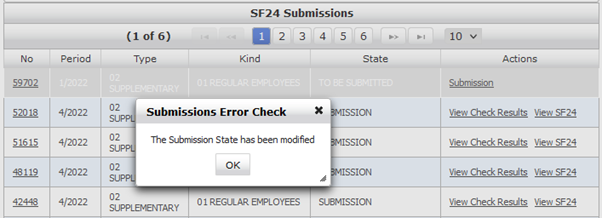

Fig: SF24 Submission
After data validation, the system will prompt ‘The Submission State has been modified,’ and the Action column will change to ‘Submission.’ Click on ‘Submission’ to submit the SF24.
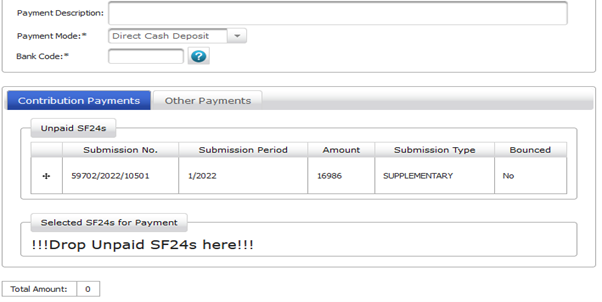

Fig: Unpaid Submission
8. Payment Order
After successful submission, proceed to ‘Payment Order’; the submission will appear in the Contributions Payments section as Unpaid submission
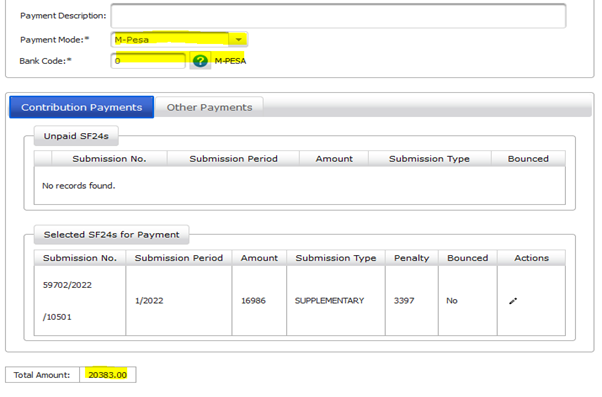

Fig: Selected Submission for Payment
Select Payment Mode from the drop-down; the available payment modes include:-
- Cheque
- Bankers Cheque
- Real Time Gross Settlement (RTHS)
- Electronic Funds Transfer (EFT)
- Cash subject to a maximum of Kshs.5.000/-
- M-PESA PayBill 333300 account number is the generated UPN
Enter the Bank Code; if known otherwise, click on ![]()

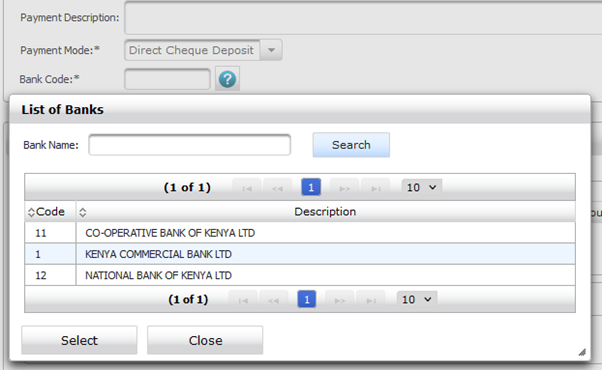

Fig: Search Bank Code
Highlight the desired bank and click on ‘Select,’ and the search auto closes
Place the computer cursor on the Asterix characters from the Unpaid Submission section and drag it to ‘!!!Drop Unpaid SF24s Here!!!’
Optionally there could be more than one Submission, or there could be other payments; click on ‘Other Payments’
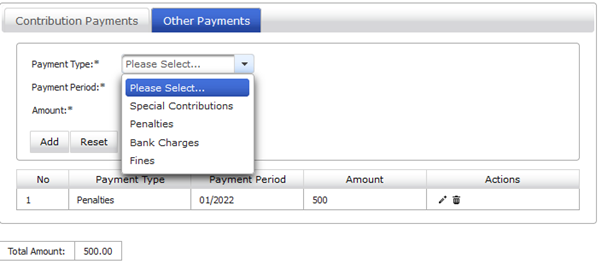

Fig: Other Payments
Total Amount will have the total amounts to be paid
9. Payment Receipts
Click on ‘Payment Receipts‘ on the left-hand menu.


Fig: Employer Payment Receipt
- Select ‘Start date’ and ‘End date,’ click on the ‘Search’ button
- The available Receipts will be displayed. To print the desired receipt, click on the , and the Receipt will be shown below
- Click on the ‘Print’ to print the receipt.